Make a Decorated Holder for a Plunger
One day, I got consumed with the large plunger used for unstopping sinks and toilets. It was setting in the corner of our bathroom like an ugly ornament I wanted to throw away. I decided it was time to make a decorated holder to house the unattractive piece.
Fortunately, I had an empty thirty-three ounce coffee can that I decided to decorate and make into a holder for the plunger. It was an easy project and took no time at all.
I happened to have lovely green wrapping paper with no designs which matched the green in our bathroom rugs and window curtain. I measured the can from the top rim to bottom rim then around the outside circumference, transferred the measurements to the wrapping paper drawing cut lines with a pencil on the back side of the paper.
Next, I cut out the shape and with a rubber stamp, I stamped the outside of the paper.
I applied rubber cement to the outside of the coffee can and to the back of the wrapping paper. It is important to apply rubber cement to both the can and wrapping paper otherwise the paper will not remain adhered to the can.
After rolling the can up in the wrapping paper, I measured the circumference of the plunger handle, eyeballed the center of the lid and made two marks on the lid with a marker. If the handle is an inch in diameter, lay the ruler at the one half inch mark at the center of the lid. Make a mark on the lid at the end of the ruler then another mark at the inch mark on the ruler. Draw a circle the width of the two marks then cut a hole in the plastic lid of the coffee can.
It doesn't have to be perfect. Now slide the plastic coffee can lid down the handle of the plunger. You will find you will not need to remove the lid from the plunger handle when you need to use it because you can slide the lid up out of the way. If your hole is bigger than the handle then you'll have to problem removing the lid when you need to use the plunger.
Put the plunger into your decorated coffee can and snap the lid into place on the can.
Voila! You now have a holder for your plunger!
Visit My Website

Custom Personalized Candy Wrappers
Monday, December 27, 2010
Monday, December 20, 2010
Make Your Own Labels for Baggies/Sandwich Bags
I quit buying Christmas gifts a few years back for my kids and parents. No, I'm not a Scrooge. My kids are grown and make their own money, parents buy anything they want or need. I do gift but I make the gifts and they are gifts of food.
To make the gifts even more personal, instead of wrapping the plastic bags of food in store bought wrapping paper I designed labels then stapled them to the the tops of the bags. The labels add a delightful touch and I have been told the gifts look as though they've been purchased from the store. You could even get the kids involved and have them draw the labels with markers or wax colors.
The regular sized sandwich bags require a 6 1/2 inch wide x 4 inch tall label. You can set the dimensions up in your word program. You can either use the clipart provided by your word program, buy clipart, trace a picture or go to the hobby store and buy stickers. Type the words Merry Christmas and/or label what is in the bag then add your art (or if you bought stickers add them after you've printed the label).
I sent cinnamon candy and pineapple muffins so each of my labels said either Homemade Cinnamon Candy or Homemade Pineapple Muffins. The labels don't have to be fancy. They can simply say what you want them to say with no art at all. Just pick a font and pick a color.
 And remember personalized labels or wrappers don't have to be only for Christmas. They're also terrific for birthdays, anniversaries, births, showers and any holiday.
Need help? Have a question about how to do labels or wrappers, leave me a comment. Need clipart? I have some on my website. Just type in Miller's Wrapped Expression and you'll find many but I'm not done adding clipart as I create new pieces everyday. I can also draw most anything you need.
Do something extraordinary!
To make the gifts even more personal, instead of wrapping the plastic bags of food in store bought wrapping paper I designed labels then stapled them to the the tops of the bags. The labels add a delightful touch and I have been told the gifts look as though they've been purchased from the store. You could even get the kids involved and have them draw the labels with markers or wax colors.
The regular sized sandwich bags require a 6 1/2 inch wide x 4 inch tall label. You can set the dimensions up in your word program. You can either use the clipart provided by your word program, buy clipart, trace a picture or go to the hobby store and buy stickers. Type the words Merry Christmas and/or label what is in the bag then add your art (or if you bought stickers add them after you've printed the label).
I sent cinnamon candy and pineapple muffins so each of my labels said either Homemade Cinnamon Candy or Homemade Pineapple Muffins. The labels don't have to be fancy. They can simply say what you want them to say with no art at all. Just pick a font and pick a color.
Need help? Have a question about how to do labels or wrappers, leave me a comment. Need clipart? I have some on my website. Just type in Miller's Wrapped Expression and you'll find many but I'm not done adding clipart as I create new pieces everyday. I can also draw most anything you need.
Do something extraordinary!
Wednesday, December 15, 2010
Repurpose, Reuse & Recycle Cardboard Boxes
With my baking and candy-making finished, I began wondering how I was going to send all the goodies to the various states in which my family live. Not much was going into each box for a total of nine boxes; a few ounces of hard candy and muffins. That was it.
"Maybe you can find boxes at the UPS store," my husband suggested.
"I'll take care of it," I replied. I was remembering last year when I tried stuffing candy and baked goods into the smallest flat rate box the post office offered. I couldn't and ended up running back to the post office to get medium sized boxes.
With everything packed into the boxes, I headed off to mail them. Imagine my surprise when I found out that each medium sized box was going to cost over ten dollars to ship! So much for the good deal in flat rate shipping which is how the postal service makes it sound.
Well, it's not a good deal. So, after recalling last year's episode of shipping off Christmas presents I did a little research. I found if I used my own boxes and ship parcel post, I would save money. The search for boxes began. I managed to find eight boxes plus one used padded envelope in which I could pack several ounces of food.
I found an old computer keyboard box, boxes I had used as storage but no longer stored stuff in; I found boxes I had packed for moving and boxes for stuff I had ordered on the internet. Why, I had boxes galore! And to tell the truth, I didn't realize I had so many that were taking up space. They were in our spare bedroom and our garage. Without intending to, I managed to create extra space by using the pre-used boxes. Not only that, but I managed to generate less trash.
What was the average cost to mail each package parcel post (not flat rate)? Seven dollars and sixty six cents per box. That was a savings of two dollars and fifty four cents per box and a total savings of nearly twenty three dollars!
Lesson: If you are shipping light items, double check flat rate shipping rates versus first class. Most importantly, re-use those empty boxes you have laying around.
Monday, December 13, 2010
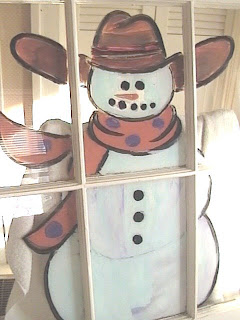
Decorative Things to do With Old Windows

I was happily surprised by a response from a lady who had two windows for me to paint for her. I thought it odd she would ask that I come pick them up and take them home with me. When I arrived at her home and saw them propped against the garage, I then understood: She was repurposing old windows she had either removed from her own house or had purchased.
It's a clever idea, really and what a great way to decorate either the inside or outside of a home. I used acrylic craft paint to paint both windows, splitting the entire scene between six panes. Several layers were required to successfully cover the glass and the paint doesn't do well is the paint brush isn't loaded to the max with lots of paint the lightly applied over the first coat.
Each pane measure eight inches by twelve inches so would accommodate a nice sized photograph so the windows could be used to frame six pictures by simply holding them with a small glue dot. Stapling one large piece or six individual pieces of fabric to the backside of the frame would be a nice decorative element as would six coordinating scrapbook papers.
This brings me to another idea of creating scrapbook pages and mounting them to the window frame. In fact, you wouldn't even have to cover all six frames. A couple or three could be left "blank".
To hang these, I would buy a picture hanging kit that included both wire and anchors that screw into wood. And, I would buy a picture hanging hook that could bare quite a bit of weight; at least five to ten pounds.
As you can see by the frame with the cardinal painting, my customer removed the old paint down to bare wood, painted or sprayed a fine layer of lacquer on it then stapled artificial garland to the frame and hot glued pine cones on to the garland.
Next time you run across old windows, don't be in too much of a hurry to walk away from them. Have fun decorating one then give it as a gift.

Friday, December 10, 2010
Daddy Shot Santa by David Graham
Daddy Shot Santa
Twas the night before Christmas and all ‘cross the farm
The critters had settled with no cause for alarm.
Our stockings we hung on our bedroom doorknobs
In hopes that Santa would bring trinkets and bobs.
The tree, just put up, seemed slender and slight,
But shined of great promise with each Christmas tree light.
The cookies and milk we displayed quite exquisite
As Mama read soft tones of Santa’s famed visit.
The hour grew late and our bedtime grew nigh,
Our excitement did brim as the minutes dragged by.
Mama’s chores done, her children bathed and fed,
Did herd us like cats to each waiting bed.
We filed up the stairs wishing Daddy Christmas goodnight,
But his whispered response gave us considerable fright.
“That old man better not come, I told him last year,
I told him ‘Stay away,’ he’s not welcome here.
“I called him a thief, a scoundrel, a dastard.
If he comes ‘round here I’ll shoot the ol’ bastard.”
Our lips did quiver; our sobs we did stifle.
For it was much too late to hide father’s old rifle.
Calm and composed, Mother tucked us with care
And wished us sleep tight with a kiss and a prayer.
Her soft steps betrayed by the squeak of each stair
“Stay in bed, be quiet, don’t make me come up there.”
Her warning we heeded for a minute or two,
‘Til silent night broke, “What shall we do?”
“Will Daddy shoot Santa,” the sister did dread.
The youngest chimed in, “I don’t want Santa dead.”
Entranced I gazed through frosted glass pane,
I puzzled and pondered and contorted my brain.
This couldn’t be true; it wasn’t quite right.
You can’t shoot Santa on Christmas Eve night.
Like the blaze of a star streaking a moonless sky
I realized in a moment there was no reason to cry.
“Don’t give it a worry, there’s no cause to whimper.
It’s only a joke,” I said with a simper.
With sighs of relief our fears were allayed,
We nestled warm blankets, no longer afraid.
When outside such racket atop our own roof.
Were those pebbles on shingles or each prancing hoof?
We moved not a muscle, our breath quite bated,
We strained to hear more and nervously waited.
Father’s heavy steps, a slamming screen door,
Shouted harsh words, “Yer not welcome no more.”
“I told you last year, stay off’n my place.
Yer a cheat, a liar, a louse-bound disgrace.
I got ol’ Betsy an’ a bad trigger twitch.
I’ll shoot yer ass now, ya ol’ som-bitch.”
What happened next I’m loathe to tell,
But Daddy shot twice, and began to yell.
“I shot the ol’ man,” our father did hoot.
“I winged the ol’ bastard; I got the ol’ coot.”
A shocked icy silence befell the homestead.
Had Daddy shot Santa; had he filled him with lead?
Not a word was spoken, not even a peep
As each child slipped into a worried, fitful sleep.
No visions of candy canes, no hopes of that toy.
We’d all grow up in a world without joy.
In morning we gathered scrubbing sleep from our eyes,
To venture downstairs to witness Santa’s demise.
But what to our weary eyes did we see?
A pile of wrapped presents under the tree.
And off in the corner sat Daddy quite smug.
He dismissed our new bounty with a wink and a shrug.
“For a fat old elf, he’s nimble and quick.
You gotta be sharp to get ol’ St. Nick.
I fired twice; he sure lit outta here,
Cursin’ and whippin’ each tiny reindeer.
“In his hurry from off his back
Fell all these gifts out of his pack.
So, merry Christmas, be of good cheer.
I’ll try it again this time next year.”
Copyright 2010 David Graham
Friday, December 3, 2010
Recycle, Repurpose Items From Your Local Donation Store
Recycling and repurposing doesn't mean always mean finding things around your house to re-use. I have done curb-side shopping. This is literally finding something sitting on the curb that someone has discarded. I have found some great old wooden chairs that I brought home, and repainted and recovered.
But my favorite place to find items to recycle or repurpose is a local donation store. I visit it once a week or when I specifically need something. During one of my weekly visits, I found a beautiful Christmas table runner tucked away between blankets and towels. I felt I had won the lottery. It was in perfect shape; no tears, stains or snags. I immediately began searching for matching place mats and napkins. Although I didn't find place mats, I found four napkins in a deep emerald color perfectly matching the table runner. They too were flawless. I couldn't believe I had scored yet again and decided that such great finds should be gifted so I mailed them to my daughter who absolutely loved them.
This week, I went in search of a throw pillow at the donation store. I found several that would have been useful for my purpose and settled on one of them that was fully stuffed, not over used, torn or stained. It cost me one whole dollar. This will also be gifted once I am finished recovering it with scrap suede leather I have stored away.
After measuring the pillow I purchased and cutting the suede, I will trace an image of a wolf's face then - using my wood burning tools - burn in pencil-like details on the smooth side of the suede. Once I'm done burning the image, it will look like a pencil drawing complete with shading and fur characteristics. Then I'll use either my old treadle sewing machine (I will have to buy a specific needle sharp enough to go through the leather) to sew the two pieces of suede into a pillow cover or quilt stitch them by hand.
The newly covered and recycled throw pillow will be a perfect Christmas gift for my parents whose home is decorated western style. And it will have cost under five dollars.
Monday, November 29, 2010
Recycle/Repurpose Christmas Cards, Children's Christmas Art, Christmas Wrapping Paper
Do you love Christmas like me? Do you want every room in your house to reflect all the wonderful red, green, blue and gold colors of Christmas? Then we have something in common.
I decorated today but found I was missing Christmas art for my walls. It wasn't long before I was scrounging around looking for something to scan or cut to size for Christmas wall art.
The first thing that came to mind was wrapping paper. But what to use for frames? Since the Christmas decorations weren't going to be up permanently, I decided I could use existing 8x10 frames housing photographs or paintings that I could put away for a month. After removing the pictures or paintings I searched through my wrapping paper and found two styles I liked. I cut an 8x10 out of each.
Both frames fortunately had backing but if they didn't have backing I would have used the art I originally removed from the frames as support for the wrapping paper. I simply laid the wrapping paper over the backing then put everything into place. They now hang in our kitchen and look great!
I wanted more, though. I remembered a 4x6 photograph of a butterfly I had taken and framed to hang in our bathroom. With the 4x6 size in mind, I decided rather than using more of the same wrapping paper I would use a card I made. I scanned and sized it to 4x6 then cut it out, put in into my 4x6 frame and hung in our living room
But if you don't have a scanner or you don't create handmade Christmas cards, you would be hard pressed to find a place to scan commercially produced cards to repurpose or recycle as wall art. Instead, cut the front of the card off and put it into a 5x7 frame. You could even cut it down to a 4x6.
If your kids drew Christmas art or you have art your children created years ago, Walmart charges under $2.90 to make 8x10 prints. Walgreens charges $2.99. You can bank on spending about $3.00 for an original 8x10 piece of Christmas wall art. And why not give it as a gift to the child who drew it?
Repurpose... Recycle... Get creative.
Monday, November 22, 2010
Homemade Christmas Gift Tins: Things to do With Cans
What can you do with empty coffee cans? Soup cans? Vegetable cans? Here are some ideas for making Christmas Gift Tins to repurpose cans.
Cut out the tag. Use a glitter pen on the edge of the tag.


 I used acrylic paint to paint the rose buds and the flower on card stock. Ran ribbon around the bottom of the can gluing it into place in assorted spots. With green glass paint, I painted "stitches" around the edge of the gift tag. Lastly, I inserted cellophane inside the can.
- Wrapping paper 10 3/8 wide by 4 1/2 for 14.5 oz cans
- Glitter pens
- Rubber stamps
- Glue (I use hot glue)
- Card stock for the tag
Cut out the tag. Use a glitter pen on the edge of the tag.


- Acrylic paint
- Card stock (I use plain white) 10 3/8 by 4 1/2 for 14.5 oz cans
- Brushes
- Ribbon
- Glue
- Glass paint used for dots and stitches
- Gold felt tip pen
Paint red stripes from top to bottom spaced the width of the brush on card stock. Let dry. Paint red stripes from side to side. Let dry. Using a gold color pen, draw lines two top to bottom in the white space between the red stripes. Draw three gold lines side to side in the white space between the red stripes. NOTE: Don't worry if the stripes are wavy or crooked. Just have fun!
Cut out the tag. With the gold color felt tip pen, draw a few branches then draw "pine needles". With red and green glass paint, add dots randomly. Let dry.
Insert tissue or cellophane inside the can.

 I used acrylic paint to paint the rose buds and the flower on card stock. Ran ribbon around the bottom of the can gluing it into place in assorted spots. With green glass paint, I painted "stitches" around the edge of the gift tag. Lastly, I inserted cellophane inside the can.
Saturday, November 20, 2010
Hand Painted Repurposed Wine Bottles


I love to decorative paint. I love to decorate items with decorative painting. One of my favorite things to paint is a wine bottle. As long as you still have the cork, decorated wine bottles are excellent for storing cooking oils or vinegars. They are prettier than the plastic container the oils and vinegars come in.
Wash, rinse and let the bottle dry. Wipe down with alcohol. Paint with acrylic enamel paint. No other kinds of paint will stick to the non-porous surface. You can let air dry for 21 days or bake it in the oven. Instructions are on the back of the bottle.
But if you're not an artist, you can either use stencils or let the kids have some fun
Friday, November 19, 2010
Repurpose Candle Wax & Tin Cans
Okay, you're not into candle making but you hate to toss candle ends or remnants from jarred candles. Here's the easiest thing to do to repurpose candle ends and remnants.
If your jarred candles are small enough to set on a fragrance warmer, that's all you have to do: Set it on the warmer.
If the candle has no fragrance or if you want to enhance the fragrance, head to Wal-Mart or a local hobby store. Be sure the fragrance is for candle wax and not for soap or lotions. You can even add a different scent to the fragrance that's in the candle. If it's a floral scent, I stick with florals. If it's an herb scent I stick with herbs. For instance, if you have a lavender scented candle, add a rose fragrance or other floral fragrance. Shoot, to lavender you could even add linen scent.
If you want to remove what's left of the candle in the jar, you'll have to use the double-boiler. I don't have one but I do make a substitute. Instructions are below.
Soak a tuna and vegetable can (or another tuna can to use on your fragrance warmer) to remove the label. Wash but be careful of the inside rim; it's probably sharp enough to cut your finger. You'll use this in the double-boiler to melt the wax.
Substitute double-boiler: I use either our fondue pot or some other large pan. Something large enough to put a smaller pan into.
I set up my make-shift double-boiler, fill about half way with water then sit my smaller pan into the water. Put the heat on low. We want about 160 to 180 degrees or just low enough to heat the water good without simmering or boiling.
Next, drop the candle bits into the tin can and put the tin can into the smaller pan sitting in the water. If you're melting wax in a jar, just set the jar into the smaller pan.
After the wax melts, add the fragrance then (using an oven mitt or pad to hold the can) pour the wax into whatever you're using on your fragance burner. You could repurpose a mayonnaise jar, baby food jar, old canning jar, etc. on the fragrance burner.
You could even simply melt the wax in the tin can or jarred candle on the fragrance burner, entirely skipping the double-burner method.
Hint: Want color? I add a little bit of crayon.
Paint the can with acrylic paints or leave as it. I wouldn't use ribbon, paper or scrap material to cover the can. I've never tried it so I wouldn't recommend it.
That's it. If you have any questions, please leave a comment.
Thursday, November 18, 2010
Repurpose Stemmed Glasses into Candle Holders
Repurpose port or brandy glasses

Painted with enamel glass paint, these glasses purchased at a donation store for 49 cents each can be turned upside down (or upright) and used as candle holders. Just hold the candles in place with a dab of plumbers putty.

Repurpose Computer, DVD, or CD Cables
Keeping Costs Down
One way to keep the cost of my crafting down is to find and repurpose materials around the house and - recently - at Goodwill. Later, I'll be writing about the clear glass items I found.
But today is about wire. I was finishing a project and wanted to adorn it with copper wire. After thinking for a moment my husband informed me that old unused computer and cable cords have copper wire internally. Between the two of us, we had stored several away. Perfect! I can repurpose copper wire out of old cables.
Using my pair of needle nose equipped with a cutter between the handle and the very tip, I set to work removing the rubber casing. Once that was removed I discovered wire mesh that I also removed.
Sure enough there in the middle of all the layers was pretty copper wire I wanted to use to adorn wine bottles I had painted.
I cut a length then bent it into a circle and slipped it over the neck of the bottle. It wasn't enough... needed something more. I cut another length then bending it I shaped it into a heart that I slipped onto the copper wire ring on the bottle.
If you can't find the materials to repurpose around the house, before you go buy them mention what you are looking for to your significant other. They just might know where you can find hidden treasure.
Homemade, Handmade: Make Your Own Wall Art
Materials:
Bronze metallic spary paint
Black spray paint
Water color paper
Leaves, sticks, grass from yard
You will have to decide how big you want your art then cut the water color paper to size.
Make sure to shake your spray paint cans to mix the paint.
Spray a base coat of Bronze Metallic on the water color paper. Let dry.
Place your leaves, sticks, grass or whatever you have gathered on the water color paper.
Lightly spray Black over the materials you collected. Remove the materials and allow the paint to dry.
Now frame it! You're done...
Subscribe to:
Posts (Atom)