Visit My Website

Visit My Website
Custom Personalized Candy Wrappers
Showing posts with label decorate. Show all posts

Friday, August 10, 2012

Freshening Up an Old Mirror

Take an old, vintage or antique mirror and freshen it up with paint.

Paints you'll need:
Black and metallic gold paint (acrylic paint in this case) for the frame.

Sage green and bright red enamel paints for glass and mirrors.

What to do:
FRAME
  • Sand the mirror frame while wearing a mask. LEAD PAINT is dangerous to your lungs.
No need to sand it to bare wood; sand just enough to remove loose paint.
  • Wipe with a slightly dampened rag or paper towel to remove dust and loose paint.
  • Paint the entire frame black and let dry. Speed up drying with a blow dryer if you wish
  • Paint on the metallic gold. Here I applied it along and inside decorative grooves. Let dry.
I lightly sanded off some of the paint to roughen the look a bit since the original paint was pitted.

MIRROR GLASS
  • Clean with vinegar and water then wipe dry.
  • Use a clean paper towel dampened with alcohol and wipe the mirror glass.
No need to wipe dry
  • Using the art brush of your choice (script, angled, flat 1/4 inch) and green enamel paint for glass, paint the vine and leaves.
  • Let dry.
  • Using the handle of a brush, dip into the red enamel and randomly apply dots (berries) around the vine. I preferred the larger handle to make bigger dots but small ones would work too.
That's it. This mirror set a few days to dry and cure before I took it to Glasgow Trading Post in Glasgow, MO, to sell.


Kitchen hand towels with flair from Visages also add to the decor
Blue floral flourish toile kitchen tea towel
Blue Floral Flourish Toile Hand Towel
Blue Floral Flourish Toile Hand Towel by Visages
Browse Zazzle for a different hand towel.

Red checked gingham kitchen hand towel or tea towel
Red Country Folk Gingham Checks Hand Towel
Red Country Folk Gingham Checks Hand Towel by Visages
See other Country Kitchen Towels

Roses in pink with green vines and leaves towel 
Peach Pink and Green Floral Victorian Art Kitchen Towels
Peach Pink and Green Floral Victorian Art Kitchen Towels by Visages
See more Cute Kitchen Towels

Blue checked gingham towel for the kitchen 
Blue Country Gingham Hand Towel
Blue Country Gingham Hand Towel by Visages
Browse other hand towel designs on Zazzle.

Kitchen Towel 16" x 24"

Brighten up any kitchen with a set of American MoJo custom kitchen towels. Made of 100% cotton twill, these durable towels will look great with your text, monogram, or artwork. Designed for a lifetime of use, these machine washable kitchen towels look great and clean up well, too!

  • Size 16" x 24".
  • Durable 100% twill cotton.
  • Fabric is made from natural fibers, which may result in irregularities
  • Handmade in the USA by sustainably employed single moms.
  • Machine washable.
Decorative wall clocks
Victorian look peony flowers
Victorian Rose Colored Peonies Picture Round Clock
Victorian Rose Colored Peonies Picture Round Clock by Visages
Shop for more Wall Clocks at zazzle.com

Country crow "Welcome Friends" on blue checks (gingham) wall clock
Country Blue Gingham Welcome Friends Square Wallclocks
Country Blue Gingham Welcome Friends Square Wall clocks by Visages
View other Country Wall Clocks

Round (Medium)

It's time to show off your favorite art, photos, and text with a custom round wall clock from Zazzle. Featured in two sizes, this wall clock is vibrantly printed with AcryliPrint®HD process to ensure the highest quality display of any content. Order this custom round wall clock for your walls or give to friends and family as a gift for a timeless treasure.
  • 2 sizes: 8" diameter (medium) or 10.75" diameter (large).
  • One AA battery required (not included).
  • Add photos, artwork, and text.
 

Monday, January 16, 2012

How to Paint a T-shirt with Acrylic Paints


How to Paint a T-shirt with Acrylic Paints

What? Acrylic paints on a shirt?

You read right... Regular acrylic paint can be used on fabric. You don't need special fabric paints that are expensive - much more expensive than regular craft acrylic paint.

And after the paint dries, it won't fade or wash off when you do laundry. I've had two t-shirts I painted a year ago and the colors are still intact and just as vibrant as the day I painted them.

Supplies:
A design... for ease just use your favorite stencil. Don't have one? Get graphite paper and trace your design on the side of the shirt you are painting (Instructions at the bottom)

Acrylic paint in the plastic bottle although you can use the more expensive tube paint

Sponge dabber or pouncer to pounce on the paint, or paint brushes if you traced a design

Cardboard to put under the layer of fabric you're painting. I use old pizza cardboard rounds after they've set for a couple of days and dried out. Or find an old cardboard box and cut out a section large enough to accommodate your design

Small container of water to rinse your brush

Some paper towel to absorb the excess water from your brush

Plastic plate or something to hold a squirt of paint

Stencil design:

Slide the cardboard between the shirt layers positioning it where you are painting your design – front or back. With straight pins, pin the cardboard into place through the side of the shirt you're painting. Slant your pins rather than pushing them straight through. If you don't, you'll find out why I suggest you do. 'Nough said.

Tape your stencil into place using masking or painters (blue) tape. I like the blue painters tape because it lifts easily; isn't so hard to remove.

Time to paint!
Grab a color... any color... your favorite color and squirt some into a plastic plate. If you squirt too little, no problem. You can just squirt more as needed.

Squirted too much? No problem... when you're done, take the top off the bottle, grab a brush or use your finger, scoop it up and add it back into the bottle scraping your brush or finger along the lip line so that the paint flows inside.

Wet your dabber/pouncer then squeeze out the water with the paper towel. Pounce it into the paint then begin pouncing the stencil shape design.

Be sure to pounce and not drag it as the paint will seep under the stencil.

Note that the material of the t-shirt soaks up the paint. This is okay but I do suggest using a good gob of paint.

As you pounce, you'll see less and less paint transferred onto the material. Dab your pouncer often into the paint so you get good coverage.

And listen... there isn't one piece... NOT ONE PIECE of art out there that is perfect. Ask any artist and they will tell you where there are mistakes in their work.

No lie...

So, if you feel your shirt isn't perfect so what? Unless you've done one horrible... and I mean horrible job of pouncing nobody will notice. In fact, you'll get compliments on your shirt.

Where'd you get that shirt?” “Did you make that shirt?” “Can you make one for me?”

Okay, you've finished pouncing your shirt.

Leave the stencil in place until the paint is fairly dry. Holding the stencil in place with one hand, peel the tape off with the other hand.

Lift the stencil straight up.

Wash off the paint from the stencil using straight warm water.

Leave the cardboard in place until the shirt is completely dry. If you don't, the paint will soak into the underside – or the second layer – of the shirt if you remove the cardboard too soon.

Once completely dry, remove the pins and cardboard. Some of the cardboard may stick to the shirt. It will come off with the first wash.

Now some suggest you throw the shirt into the dryer to set the paint.

I have not found this to be true. I have never dried to set the paint. I simply wait until the paint is dry – 24 hours - then I wear it.

Suggestions:
Stencil acrylic paint on jeans, cloth napkins, jackets, baby onsies/body suits, socks, dish towels, area rugs, sweatshirts, tote bags, edges of sheets or table cloths... Only your imagination will get into the way of thinking of ways to use this creative way to decorate material.

Tracing designs onto your t-shirt with graphite paper:

Using blue painters tape which is easily removed, tape only one edge of your design onto your shirt. You could also pin the paper design along one edge.

Slide the graphite tracing paper - graphite down - between your picture and the shirt material then on a hard surface begin transferring with a ball point pen.

Don't press too hard or you'll go through the papers.

Every so often you can lift the paper and graphite paper to see where you are or what you have missed. Just make sure you don't allow the design to shift or move in any way. Other wise you'll have part of the design in one area and continuing in another. 

To the right is a black t-shirt I painted for my mother. She was so proud of it, she wore it to church the very day I delivered it.

For all of my original designs (NEVER sell designs you've traced that belong to someone else), I charge the cost of the shirt plus $10. Cheap when you consider the time put into it but I tell you, people LOVE the thought of a hand painted shirt.

You can find more original designs at my online store, Visages.

Below are some of my newest designs many of which you can personalize with a name or your own quote or saying!


Got What I Wanted shirt
Got What I Wanted by Visages
Browse other tees made on zazzle
Panda Bear Chef Likes Honey Badgers shirt
Panda Bear Chef Likes Honey Badgers by Visages
Browse zazzle for a different shirtzazzle

Monday, December 27, 2010

How to Recycle, Repurpose a Coffee Can

Make a Decorated Holder for a Plunger

One day, I got consumed with the large plunger used for unstopping sinks and toilets. It was setting in the corner of our bathroom like an ugly ornament I wanted to throw away. I decided it was time to make a decorated holder to house the unattractive piece.

Fortunately, I had an empty thirty-three ounce coffee can that I decided to decorate and make into a holder for the plunger. It was an easy project and took no time at all.

I happened to have lovely green wrapping paper with no designs which matched the green in our bathroom rugs and window curtain. I measured the can from the top rim to bottom rim then around the outside circumference, transferred the measurements to the wrapping paper drawing cut lines with a pencil on the back side of the paper.

Next, I cut out the shape and with a rubber stamp, I stamped the outside of the paper.

I applied rubber cement to the outside of the coffee can and to the back of the wrapping paper. It is important to apply rubber cement to both the can and wrapping paper otherwise the paper will not remain adhered to the can.

After rolling the can up in the wrapping paper, I measured the circumference of the plunger handle, eyeballed the center of the lid and made two marks on the lid with a marker. If the handle is an inch in diameter, lay the ruler at the one half inch mark at the center of the lid. Make a mark on the lid at the end of the ruler then another mark at the inch mark on the ruler. Draw a circle the width of the two marks then cut a hole in the plastic lid of the coffee can.

It doesn't have to be perfect. Now slide the plastic coffee can lid down the handle of the plunger. You will find you will not need to remove the lid from the plunger handle when you need to use it because you can slide the lid up out of the way. If your hole is bigger than the handle then you'll have to problem removing the lid when you need to use the plunger.

Put the plunger into your decorated coffee can and snap the lid into place on the can.

Voila! You now have a holder for your plunger!

Monday, December 13, 2010

Decorative Things to do With Old Windows

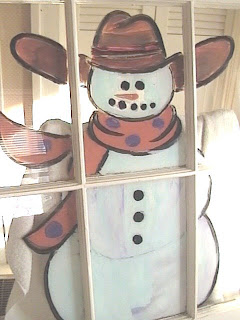
To earn a little extra income, I placed an ad on Craigslist for holiday window painting. It's an art that is slowly going by the wayside.

I was happily surprised by a response from a lady who had two windows for me to paint for her. I thought it odd she would ask that I come pick them up and take them home with me. When I arrived at her home and saw them propped against the garage, I then understood: She was repurposing old windows she had either removed from her own house or had purchased.

It's a clever idea, really and what a great way to decorate either the inside or outside of a home. I used acrylic craft paint to paint both windows, splitting the entire scene between six panes. Several layers were required to successfully cover the glass and the paint doesn't do well is the paint brush isn't loaded to the max with lots of paint the lightly applied over the first coat.

Each pane measure eight inches by twelve inches so would accommodate a nice sized photograph so the windows could be used to frame six pictures by simply holding them with a small glue dot. Stapling one large piece or six individual pieces of fabric to the backside of the frame would be a nice decorative element as would six coordinating scrapbook papers.

This brings me to another idea of creating scrapbook pages and mounting them to the window frame. In fact, you wouldn't even have to cover all six frames. A couple or three could be left "blank".

To hang these, I would buy a picture hanging kit that included both wire and anchors that screw into wood. And, I would buy a picture hanging hook that could bare quite a bit of weight; at least five to ten pounds.

As you can see by the frame with the cardinal painting, my customer removed the old paint down to bare wood, painted or sprayed a fine layer of lacquer on it then stapled artificial garland to the frame and hot glued pine cones on to the garland.

Next time you run across old windows, don't be in too much of a hurry to walk away from them. Have fun decorating one then give it as a gift.

Saturday, November 20, 2010

Hand Painted Repurposed Wine Bottles

I love to decorative paint. I love to decorate items with decorative painting. One of my favorite things to paint is a wine bottle. As long as you still have the cork, decorated wine bottles are excellent for storing cooking oils or vinegars. They are prettier than the plastic container the oils and vinegars come in.
Wash, rinse and let the bottle dry. Wipe down with alcohol. Paint with acrylic enamel paint. No other kinds of paint will stick to the non-porous surface. You can let air dry for 21 days or bake it in the oven. Instructions are on the back of the bottle.

But if you're not an artist, you can either use stencils or let the kids have some fun