Visit My Website

Visit My Website
Custom Personalized Candy Wrappers

Wednesday, September 26, 2012

Repupose and Upcycle Old Cutting Boards

Taking things - discarded items nobody wants - and turning them into decorative and sometimes even useful items has become a challenging pastime.

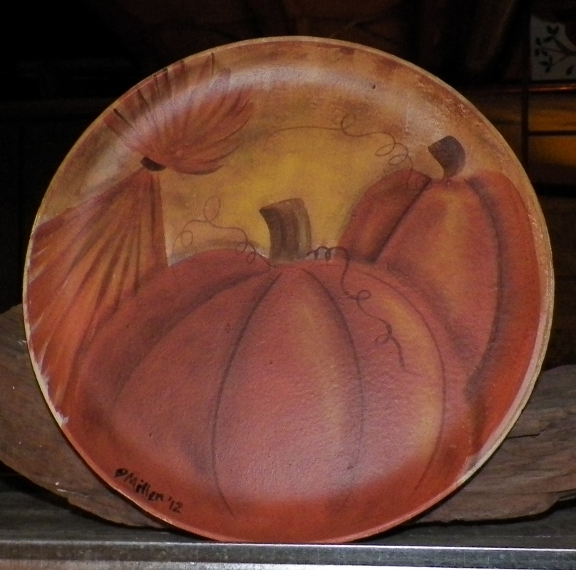
For instance, take the two cutting boards pictured to the left. I considered turning them into shelves or even racks for towels or jackets but in the end decided to keep it simple by painting uncomplicated images on them.

A painted star and burning candle on the plain wood of this paddle cutting board was something I'd been considering for some time.

The stenciled star was painted in antique gold and is surrounded by burnt umber. Burnt umber was dry brushed along the inside edges of the star.

The candle stick consists of a straight line using barn red and a half-inch brush, a float of burnt umber on the left while on the right is dry brushed white. The flame was created using one stroke of antique white with yellow, orange and blue layered on top. A hint of a wick was added. Burnt umber, black or grey will work fine for it.

Lastly, antique white was dry brushed around the flame up into the bottom of the star.


The cat silhouette board was based with one layer of black wash then multiple layers and colors (nutmeg, gold then antique white) were slapped on with abandon to create a background for the silhouette.

The cat silhouette was painted using a flat one inch brush loaded with black. Basic shapes in multiple layers of black were used for all parts than a hint of a shadow using burnt umber was added along the right edge.

A hole was drilled at the center top of the board and a piece of scrap material was poked through and tied in a knot to be used as the hanger.

A simple day project to create simple, country primitive decor for you or as gifts.

Have fun!

Please visit my online gift store, Visages


Cute Folk Country House and Picket Fence Art Poster

Cute Folk Country House and Picket Fence Art Poster
Cute Folk Country House and Picket Fence Art Poster by Visages
More Dragonflies Posters

Kitty Cat Christmas Picture Rectangle Stickers 
Kitty Cat Christmas Picture Rectangle Stickers
Kitty Cat Christmas Picture Rectangle Stickers by Visages
Browse other Christmas Stickers

  Schipperke Picture Trucker Hats
Schipperke Picture Trucker Hats
Schipperke Picture Trucker Hats by Visages
See other Little skipper Hats

  Owl Porcelain Candy Jar
Owl Porcelain Candy Jar
Owl Porcelain Candy Jar by Visages
See more With owl Candy Jars

  Funny Ferrets Shirts
Funny Ferrets Shirts
Funny Ferrets Shirts by Visages
Get the best in online t-shirt printing from zazzle.com.

 Who da Man? 3 Retro Colored Owls Spiral Note Books
Who da Man? 3 Retro Colored Owls Spiral Note Books
Who da Man? 3 Retro Colored Owls Spiral Note Books by Visages
Find other journals at Zazzle

 Colorful Painted Butterflies Mouse Pads
Colorful Painted Butterflies Mouse Pads
Colorful Painted Butterflies Mouse Pads by Visages
Check out more mouse pad.

Panda Bear Picture iPhone iPhone 5 Covers
Panda Bear Picture iPhone iPhone 5 Covers by Visages
Check out more covers for iPhone 5

Cute Nursery Room Bird Cartoon Gallery Wrapped Canvas 
Cute Nursery Room Bird Cartoon Gallery Wrapped Canvas
Cute Nursery Room Bird Cartoon Gallery Wrapped Canvas by Visages
View more art printed on canvas on Zazzle

First Mothers Day Baby Bird Greeting Cards
First Mothers Day Baby Bird Greeting Cards by Visages
Browse other Greeting Cards

Picture of Panda Bear Chef Posters 

Sunday, September 23, 2012

Old White Sheets Make Up Candy Corn Pillows

Worn out white sheets were given to me by our neighbor who lives down the road. They were lovely but unusable for bedding.

What to do with them? Recycle, upcycle and repurpose, of course!

The pictured candy corn pillow made from an old sheet was my first. It measures 11 inches on all sides. I have since changed my pattern measurements: 11 inches across the bottom; 13 3/4 sides all raw edge measurements.

Materials:
* white material of some sort
* straight pins
* scissors
* ruler
* newspaper (to make pattern)
* sewing machine (or sew by hand)
* fiber fill (I found an old unused pillow, ripped it open and used its filling)
* acrylic off white, dark orange like burnt orange or terra cotta, and gold. Basically you'll want to use colors that are muted and antique looking unless you prefer bright colors and you aren't going for the "primitive" look
* One inch flat brush
* Water to rinse brush

Measure and mark 11 inches starting at the outside corner and along the bottom edge of the newspaper.

Mark at 11 inches.

Measure upward (vertical) 13 3/4 along the outside edge and at the 11 inch mark, and mark both.

Now place a mark at five and a half inches between the two top (13 3/4) marks.

Lay the ruler down at the 11 inch and five and a half inch mark then draw a line to create one side.

Lay the ruler down at the outside corner and the five and a half inch mark then draw a line.

You now have the triangle. Cut out along the lines.

Pin the cutout triangle onto your fabric and cut out the shape.

Or fold the fabric, pin on the newspaper pattern and cut out two shapes at once.

Remove the pins and paper pattern then repin the fabric pieces together.

Sew quarter inch seams leaving an opening large enough at the bottom to stuff fiber fill.

To really make the pillow look like candy corn, don't make triangle points. Instead, sew curves at each point (semi-circles).

Cut off the points and snip the now-curved points of the triangle.

Turn right side out and stuff. Make sure to poke the stuffing well into the corners so they'll hold their shapes.

Sew closed using a simple stitch of your choice (like a whip-stitch).

TO PAINT:

Load your flat brush into gold and draw a line about three inches up from the bottom on one side of the pillow. Fill in the space from the line you made to each seam.

Rinse brush, load with terra cotta. Draw a line two and a half to three inches from the top. Fill the space between the gold and the orange line and side to side using the seam as the stopping point.

What we're doing is just painting one side of the pillow. Then we'll let it dry and repeat the process on the other side.

Rinse brush.

Paint the tip of the candy corn with off white.

After the paint dries, do the same thing to the other side of the pillow.

The paint will dry stiff. Leave as is OR sand it a bit to soften it. Don't get over-zealous with the sandpaper. You'll remove all the work you did painting.

 Cute Country Scarecrow Matching Postage
Cute Country Scarecrow Matching Postage
Cute Country Scarecrow Matching Postage by Visages
See more Matching Stamps

Cute Halloween Scarecrow Folk Art Rectangular Cake Picks 
Cute Halloween Scarecrow Folk Art Rectangular Cake Picks
Cute Halloween Scarecrow Folk Art Rectangular Cake Picks by Visages
Shop for more Cake Picks at zazzle.com

Cute Halloween Jack OLantern and Crow Custom Invitations
Cute Halloween Jack O'Lantern and Crow Custom Invitations
Cute Halloween Jack O'Lantern and Crow Custom Invitations by Visages
Design a personalized invitation at Zazzle

Cute Halloween Jack O'Lantern and Crow Postage Stamp
Cute Halloween Jack O'Lantern and Crow Briefmarke
Cute Halloween Jack O'Lantern and Crow by Visages
More Cute Stamps

I Heart (Love) Halloween Tote Bags 
I Heart (Love) Halloween Tote Bags
I Heart (Love) Halloween Tote Bags by Visages
More Love Bags

Princes Pumpkin Halloween Party Invitations 
Orange Halloween Envelope
Orange Halloween Envelope by Visages
Order envelopes from zazzle

 Halloween Princess Pixie Shirt

Tuesday, September 18, 2012

This hand painted vintage metal cake carrier (holder or cover) was originally bare silver metal (tin, I wonder) when it was given to me by Donnie, owner of Glasgow Trading Post.

I used acrylic paint then sealed it with a water-base varnish more to protect the paint than anything but in the end the piece appears to be enamel coated.

If you tackle the project be prepared to use at least three layers of acrylic to base-coat it. But once you have it base-coated, depending on what element you're painting you can get away with using only one layer of paint.

The next
project - also given to me by Donnie - is a sponge cake pan also originally bare silver metal. Again, you'll have to base coat at least three layers.

Color was floated below the edge of the "icing" with dry brushed highlights on the "icing" to make it appear three dimensional and no other decorative elements were added. I wanted it to look like a cake setting out in the kitchen but it will also look good on a kitchen wall.

This piece was also finished with water-base varnish.

Note: Acrylic doesn't stick to metal as there is no adhesive in the paint. It's strictly water-base with pigment.

To help the paint to stick, you have the option of sanding to roughen the metal or using spray enamel paint as the base coat.

These items are for sale at Glasgow Trading Post in Glasgow, Missouri. Have fun with the two projects!

Please visit my gift store, Visages. Below are just a few of my original designs. 

Funny Tea Mug Quote Hand Warmer 
Funny Tea Mug Quote Hand Warmer
Funny Tea Mug Quote Hand Warmer by Visages
Get the best in mug printing from Zazzle.

I Heart (Love) Hot Cocoa Mugs
I Heart (Love) Hot Cocoa Mugs by Visages
View more Hot cocoa Mugs

Hot Caliente Jalapeno Peppers Sticker 
Hot Caliente Jalapeno Peppers Sticker
Hot Caliente Jalapeno Peppers Sticker by Visages
See other Caliente Stickers

Orange Plaid Gift Tile Trivet 
Orange Plaid Gift Tile Trivet
Orange Plaid Gift Tile Trivet by Visages
View other tiles

Green Plaid Tile Trivet 
Green Plaid Tile Trivet
Green Plaid Tile Trivet by Visages
View other tiles

Snowman Chef in Apron & Chefs Hat 
Hot Caliente Mug
Hot Caliente Mug by Visages
Personalize coffee mugs at Zazzle

I Heart (Love) Coffee or Candy Jar

Wednesday, September 12, 2012

Repaint Old Garage Sale Decorative Plates

Garage sale find: Three decorative plates with ugly images for a total of 10 cents. What to do with them? Repaint them with acrylic paint, of course!

Top: To paint the edge, I laid a disposable plastic plate on top of my garage sale find then ran a lead pencil around the outer edge and painted the edge black using the line as a guide.

Middle and bottom: Nothing special about the painting techniques. Just a bit of dry brushing on the pumpkins.

All plates were sealed with water based varnish.

There are the ideas. Have fun!


Country Red Check Gingham Birdhouse Plates
Country Red Check Gingham Birdhouse Plates by Visages
Browse more Gingham Plates

Country Blue Gingham Welcome Friends Plates
Country Blue Gingham Welcome Friends Plates by Visages
See other party plates

Primitive Americana Barn and Sheep
Primitive Americana Barn and Sheep Plato De Cena
Primitive Americana Barn and Sheep Plato De Cena by Visages
View other Primitive Plates

Cute Blue Country House in the Sunshine Dinner Plate
Cute Blue Country House in the Sunshine Dinner Plate by Visages
Shop for another party plate

Cute Country Angel Watering Flowers Party Plates
Cute Country Angel Watering Flowers Party Plates by Visages
See other Cute Plates

Kitty Cat with Hearts Picture Dinner Plates 
Kitty Cat with Hearts Picture Dinner Plates
Kitty Cat with Hearts Picture Dinner Plates by Visages
View more plate designs from Zazzle.

Retro Color Owl Collectible Plate
Retro Color Owl Collectible Plate by Visages
Create unique custom plates online at Zazzle.

World's Best Cook Panda Bear Chef Plate
World's Best Cook Panda Bear Chef Plate by Visages
Browse With panda Plates

Bright Colorful Painting of Flower in Meadow Plate
Snowman Chef in Apron & Chef's Hat Plates
Snowman Chef in Apron & Chef's Hat Plates by Visages
Create unique custom plates online at Zazzle.

Rooster Crowing Plate

Sunday, September 9, 2012

Upcycle Repurpose Vintage Glass Vacuum Coffee Maker

Create a lovely candle holder with a vintage vacuum coffee pot with little effort like I did with this one given to me by some folks who were cleaning out their vacation country home in Missouri.

Remove the metal and ceramic internal parts.

There is no need to remove the glass vacuum tube (tube attached to upper deck of pot).

Fill the bottom with imitation rose buds and leaves, or buttons, or old wooden thread spools, or marbles, or just anything that suits your fancy.

I chose imitation rose buds and leaves 1) because they match the Christmas candle I painted and 2) they are the only thing I found at the second hand (thrift) store I was attracted to and that fit my budget of $1.

Put the upper half of the coffee pot back on, tie a torn strip of scrap fabric matching the color you added to the bottom part of the pot (or your decor) then insert a pillar candle.


This is certainly an eclectic idea and so easy, so fun and just plain so unique.

Get an "I upcycle & repurpose" tee at Visages Gift Store.